Use Your Own Lists for Email Distribution

Tags ListServ

OVERVIEW

ListServ email lists are excellent for streamlining communication, or emailing multiple addresses simultaneously without hitting server recipient limits. For example:

  • If you are a faculty member, you might prefer to email assignments and other information to all of your students at once, and without the need for BCCs.
  • If you are a president of a recognized student organization, you might wish to communicate with your fellow members.
  • A department head or assistant might wish to send email to their colleagues, or to students majoring in that department's subject(s).

Before Requesting a List

  • Be prepared to manage your list. A list owner reviews and adds or deletes subscriptions on the list, among other functions. List owners are responsible for the content of the mailings, which must conform to the Acceptable Use Policy . See the List Manager's Survival Guide for more information.
  • Consider how you will obtain addresses to subscribe. IT does not provide addresses for these lists, so list owners might choose to gather addresses via sign-up sheets, social media, Hyperion, or requests made to Drexel database personnel.
  • Consider the number and stability of your subscriber base. A list might not be appropriate for five subscribers, but would be indispensable for five hundred. A large, dynamic list (e.g. an open discussion list) will require more attention to list management than a small, static one (e.g. class lists for faculty).

Pros and Cons of Lists

Pros
  • Lists have no recipient limit.
  • You can send messages to one address, instead of hundreds.
  • No approval is needed to send messages.
  • List settings can be customized to meet specific needs.
  • You can restrict or open subscription/unsubscription as necessary.
Cons
  • List owners must learn to manage their lists.
  • Email addresses for the list must be obtained outside of IT.
  • Lists do not automatically update their subscriptions (exceptions apply).

 Request a List Creation

Please allow the Mass Mailing team at least two business days to create your list(s). However, lists are often created more quickly. 

Request Class List Creation

To request creation of a class list, follow these steps:

  1. Sign into Photo Class List with your Drexel credentials.
  2. Select the appropriate course, then click View/Request Email List.
  3. Click the Request a class list link.
  4. Select list options and click Submit Request to Mailreq.
    Note: You can put different or multiple email addresses in the "owner" field, or even leave a text note for the Mass Mailing team.

The Mass Mailing team will create the list and email you when it is ready.

Multiple course sections can be concatenated under a master list. Email mailreq@drexel.edu for more information.


Request Department/Organization List Creation

To request a department/organization list creation, send the following information to listreq@drexel.edu:

  • Contact Person
  • List Name
    The name of your list will form part of its email address. Adding a "-L" to the name is an optional convention that labels it as a ListServ list. Please ensure name accuracy--names are semi-permanent.
  • List Type
    Announcement: Only list owners/senders can email the list.
    Discussion: Owners, senders, and other participants (public or private) can email the list.
    Moderated: Anyone can email the list, but messages are moderated prior to distribution.
  • List Owner(s) Email Addresses*
  • (Optional) Authorized Sender(s) Email Addresses
  • (Optional) List Editors/Moderators
    Only applies to the Moderated list type.
  • Errors and Replies
    Errors To: The email address errors should be sent to. Default is the list owner.
    Reply To: Can be a specified email address, or the list itself (if list type is Discussion or Moderated). Default is message sender.
  • Number of List Subscribers
    Rough estimates are acceptable.

*Note: With the implementation of Single-Sign On (SSO) at https://lists.drexel.edu , all list owner email addresses must be able to sign in with Drexel credentials in order to manage their lists. Sending messages to lists remains unchanged.

More list options are available, and most list settings can be modified at any time. If you have questions or specific needs, contact mailreq@drexel.edu.

Your requested class list has been created and is ready to use. Now what?

Automatic List Updating

All ListServ class lists are configured to update automatically. Thus, any students who add or drop the class will be subscribed and unsubscribed from the list by the system. No need to worry about keeping it up-to-date!

Emailing the Class

Once your class list has been created, you can begin emailing your class right away. Here's how to use the list:

  1. Compose a new email message.
  2. Address the message to your list email (ex. abc123-001-201125@lists.drexel.edu).
  3. Type your subject and message as usual.
  4. Click "Send."

It's that simple!

If you selected confirmation when you requested your list creation, before your message is sent to your class, ListServ will respond with a confirmation request. Simply click the link provided to confirm your message. It will then be distributed to the class list.

Note: Regarding the format of the list's email address, "abc123" is the course number, "001" is the section number, and "201125" is the course term. Yours will match the class it was requested for.

Checking the Roster

Not sure if a student is subscribed to your class list? One way to check who is or isn't subscribed to the class list is to view the class roster for the course at Photo Class List (http://www.drexel.edu/classlist ). Whoever appears in the list of registered students for the course is included in the class email list.

Subscribing Other Individuals

Need to subscribe a TA or a student's personal email address to the class list? Any email address can be subscribed directly to the class list. However, any addresses manually subscribed to the class list will not be automatically updated.

If you need to have an address subscribed or removed from a class list, please let us know at mailreq@drexel.edu.

List management is generally the responsibility of the list owner. Please review the information in this guide about how to manage and use a ListServ list.

The list name will usually be in the format listname-L. The list address is the email address for your list, in the format listname-L@lists.drexel.edu. These two elements will be very important to keep track of, as all list management functions and uses will depend on them.

Sign In to ListServ

Beginning in 2026, the list management site at https://lists.drexel.edu uses your Drexel Credentials via Single Sign-On (SSO). Please ensure that your lists are owned by the abc234@drexel.edu version of your Drexel Official Email or you won't see them in your management drop-down.

Note: Shared mailboxes can still send email to lists, but all lists should be primarily managed from an individual Drexel email account that can access SSO.

Manage Your List(s)

List owners are assigned ownership of their ListServ lists via their specified email addresses. List management itself includes:

  • Adding and/or deleting subscribers
  • Reviewing list subscribers
  • Modifying list ownership and list settings

All ListServ lists can be managed via the Web Interface at https://lists.drexel.edu .

To get started with your lists, see the below section: Using the ListServ Web Interface.

 Using the ListServ Web Interface

ListServ 17 Interface Upgrade

Note: As of the upgrade to ListServ Version 17, there have been some visual and organizational changes to the Web Interface. The information below has been updated accordingly.

Getting Started

The first time you sign in at https://lists.drexel.edu , a cookie will be saved in your browser. This cookie will keep you signed in until you sign out or clear your browser cache.

If you own one list, you will automatically enter management of that list when you open the Web Interface.

If you own more than one list, you will see a drop-down menu under List Management > List Dashboard. Select the list you want to manage. You will enter management for that list for your duration in the Web Interface, unless you select another list, sign out, or close the browser window.

All menus can be accessed from the Navigation panel on the left. Older versions of ListServ previously had these tabs in a top Navigation bar.
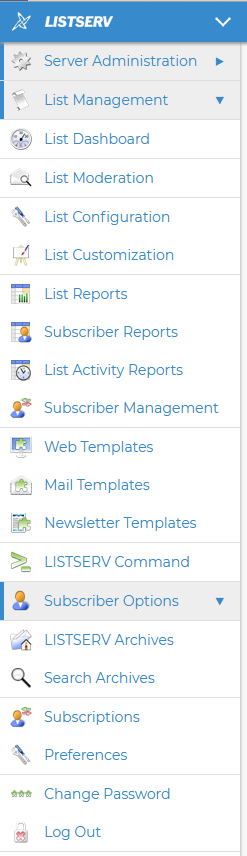
ListServ 17 Left Navigation Panel

List Management Menu

The List Management menu is where you can perform all list management functions.
  • List Dashboard
  • List Moderation
  • List Configuration
  • List Customization
  • List Reports
  • Subscriber Reports
  • List Activity Reports
  • Subscriber Management
  • Web Templates
  • Mail Templates
  • Newsletter Templates
  • LISTSERV Command

Subscriber Options Menu

  • LISTSERV Archives
  • Search Archives
  • Subscriptions
  • Preferences
  • Change Password
  • Log Out

Managing List Subscribers

Adding Subscribers

To add a single subscriber, go to List Management > Subscriber Management. If you own more than one list, be sure to select the appropriate list from the drop-down menu on this page.

In the Email Address and Name field, enter the email address to subscribe, optionally followed by the full name, using one of the example formats in green. Click Add Subscriber.

By default, new subscribers are not notified. This is the recommended setting.

Deleting Subscribers

To delete a single subscriber, go to List Management > Subscriber Management. If you own more than one list, be sure to select the appropriate list from the drop-down menu on this page.

In the Search for Subscribers field, enter the name or email address to look up. If there's no match, you will see Scan: No Match in red.

If the subscriber is found, the subscriber options screen will load. Here you can update the subscriber's name or email address, or make changes to their subscription options.

To delete the subscriber, click Delete at the bottom of the page.

By default, subscribers are not notified of deletion. This is the recommended setting.

Bulk Operations

As of ListServ 17, Bulk Operations (adding and removing subscribers in bulk from a list) has moved.

Go to List Management > Subscriber Reports. You can add a single subscriber to list here as well, but click the link for Bulk Operations on this page to open a window with the following options:

  • Add the imported addresses to the list
  • Replace current subscribers with the imported addresses
  • Remove the imported addresses from from the list
  • Remove the imported addresses from all lists

You can attach a plain text file (.txt) to add or remove subscribers in bulk. Use the following format in your saved plain text file (first and last names are optional):

example1@drexel.edu FirstName LastName
example2@drexel.edu
example3@drexel.edu

Reviewing Subscriptions

As of ListServ 17, subscriber review options have moved.

To review what addresses are subscribed to a list, go to LISTSERV Command. Ensure the list you want to review is selected, and click Review (listname-l) under Sample Commands.

Need Help?

Contact the Mass Mailing Team at mailreq@drexel.edu.